Introduction
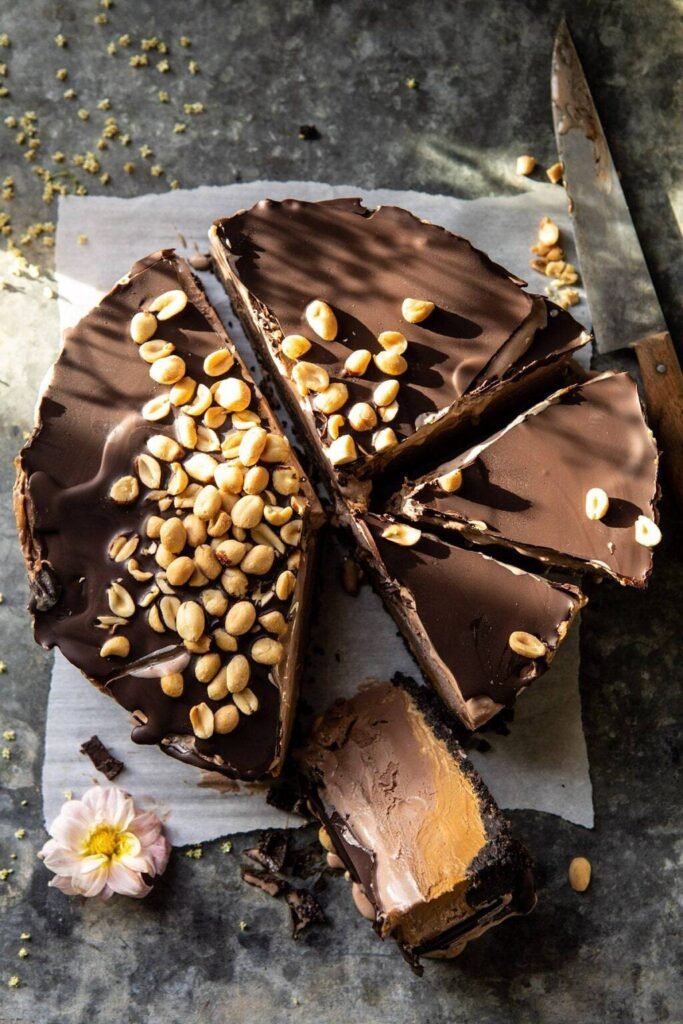
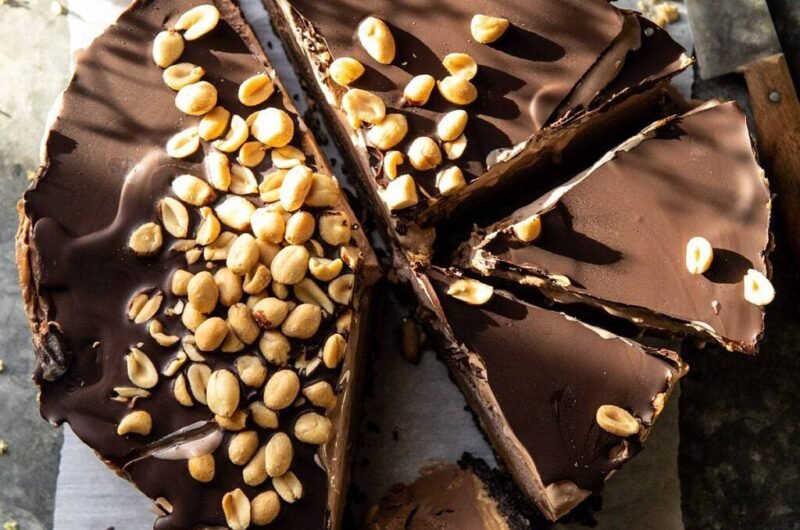
Need a dessert that looks impressive without spending hours in the kitchen? Nonnie’s 6 Ingredient Chocolate Peanut Butter Ice Cream Cake is one of those simple treats that always feels like a celebration. With layers of creamy ice cream, rich chocolate flavor, and smooth peanut butter goodness, it delivers a comforting combination that people of all ages enjoy. This recipe is especially helpful for birthdays, family gatherings, summer weekends, or those evenings when you want something special waiting in the freezer. I often keep the ingredients on hand because the assembly is wonderfully easy. Every slice offers a cool, creamy texture that makes dessert feel both fun and comforting.
Why You Will Love This Recipe
Looking for a dessert that doesn’t require baking skills? This recipe keeps things wonderfully simple with only six ingredients and very little hands-on work. The layers come together quickly, making it easy for beginners and experienced home cooks alike. The chocolate and peanut butter combination creates a rich flavor that feels familiar and satisfying.
Want a dessert you can prepare ahead of time? Nonnie’s 6 Ingredient Chocolate Peanut Butter Ice Cream Cake is freezer-friendly and ideal for planning ahead. It saves time on busy days because the freezer does most of the work. The ingredients are affordable, easy to find, and flexible enough for different serving sizes. Whether you’re feeding four family members or preparing dessert for a larger gathering, this cake adapts easily while remaining a crowd-pleasing favorite.
Ingredients
Wondering which ice cream works best? Choose a firm chocolate ice cream that slices cleanly after freezing.
- 1 quart chocolate ice cream, slightly softened
- 1 cup creamy peanut butter
- 12 chocolate sandwich cookies, crushed
- 4 tablespoons melted butter
- 1 cup whipped topping
- ¼ cup chocolate syrup
For 2 people, prepare half the amount in a smaller dish. For more than 4 people, increase the ingredients evenly and use a larger pan.
Instructions
Step 1: Preparation
Mix the crushed chocolate sandwich cookies with the melted butter until evenly coated. Press the mixture firmly into the bottom of an 8-inch freezer-safe dish. Place it in the freezer for 10 minutes to help the crust set.
Step 2: Main Cooking Process
Spread half of the softened chocolate ice cream over the chilled crust. Smooth the surface with a spatula. Freeze for about 15 minutes until the layer feels firm enough to support the next ingredients without mixing together.
Step 3: Combining Ingredients
Warm the peanut butter slightly until spreadable, then drizzle and spread it over the ice cream layer. Add the remaining chocolate ice cream and smooth the top. The layers should appear even and distinct for clean slices later.
Step 4: Finishing & Final Simmer
Spread the whipped topping across the top and drizzle with chocolate syrup. Cover tightly and freeze for at least 4 hours or overnight. Larger cakes may need additional freezing time, while smaller portions can set more quickly.
Why This Recipe Works for Busy Days
Need a dessert that can be made long before guests arrive? This recipe is perfect for planning ahead because everything is assembled in advance and stored in the freezer. There is no last-minute baking or decorating required. It also keeps well, making leftovers easy to enjoy throughout the week whenever a sweet craving appears.
Tips & Tricks
- Allow the ice cream to soften slightly before spreading. Ice cream that is too hard can tear the crust and create uneven layers. If you’re making a smaller version for two people, shorten the softening time so the ice cream doesn’t melt too much.
- Freeze between layers whenever possible. Skipping this step can cause the layers to blend together instead of staying neat and distinct. For larger cakes, an extra few minutes of freezing can help maintain clean layers.
- Press the cookie crust firmly into the dish. A loose crust may crumble when serving. Whether making four servings or a larger batch, taking a little extra time during this step creates a sturdier base.
- For cleaner slices, dip a knife into warm water and wipe it dry before cutting. This simple trick helps glide through the frozen layers. Repeat between slices, especially when serving a larger group.
Variations
Meaty Version
Looking for a sweet-and-salty twist? Sprinkle finely crumbled crispy bacon between the peanut butter and ice cream layers. The salty crunch complements the chocolate beautifully. If serving several guests, offer bacon as an optional topping so everyone can customize their slice.
Vegetarian Option
Need a dessert suitable for vegetarian guests? This recipe is typically vegetarian-friendly when using standard ingredients. Check labels if needed, especially for cookies and toppings. The preparation stays exactly the same, making it an easy dessert for mixed gatherings.
Ingredient Swap
Missing chocolate ice cream? Use vanilla, peanut butter, or cookies-and-cream ice cream instead. Different flavors create new combinations while keeping the recipe simple. When increasing the recipe for more than four people, adjust the substitute ingredients evenly.
Flavor Boost
Want a little extra richness? Add a sprinkle of mini chocolate chips or chopped roasted peanuts between the layers. These simple additions create extra texture and flavor. They can easily be increased or reduced depending on the number of servings.
Serving Suggestions
Family Celebration Slices
Planning a birthday or family gathering? Serve each slice with an extra drizzle of chocolate syrup and a small spoonful of whipped topping. This simple presentation makes the dessert feel festive without requiring additional preparation.
Fresh Fruit Pairing
Looking for balance alongside the rich flavors? Serve the cake with fresh strawberries or sliced bananas. The fruit adds color and freshness while complementing the chocolate and peanut butter combination beautifully.
Dessert Board Display
Hosting several guests? Arrange slices on a large platter with bowls of chopped peanuts, chocolate chips, and fruit. Guests can customize their servings while creating a cozy dessert-table experience for larger gatherings.
Movie Night Treat
Need a casual dessert for a relaxed evening? Serve smaller slices alongside cold milk or hot coffee. The creamy texture and rich flavors make it an easy favorite for family movie nights and weekend gatherings.
Storage Instructions
Fridge Storage
Wondering if this cake can stay in the refrigerator? Because it contains ice cream, refrigeration is not recommended for long storage. The layers will soften too much. Keep it frozen and transfer slices directly from the freezer when serving.
Reheating
Concerned about serving texture? This dessert does not require reheating. Instead, let it sit at room temperature for 5 minutes before slicing. This softens the layers slightly while maintaining the structure of the cake.
Freezing
Need to store leftovers? Cover the cake tightly with plastic wrap or place slices in airtight containers. It can remain frozen for up to 2 weeks. Smaller portions can be stored individually for quick and convenient desserts later.
Make-Ahead Tips
Trying to simplify party preparation? Make the cake one or two days before serving and keep it frozen. This allows the layers to fully set while freeing up valuable time for other meal and event preparations.
Recipe Timing
Prep Time: 20 minutes
Cook Time: 0 minutes
Rest Time: 4 hours freezing time
Total Time: 4 hours 20 minutes
Nutrition Information (Approximate)
Curious about the nutrition details? Each serving contains approximately 450–550 calories and 8–12 grams of protein. The recipe also provides calcium from dairy ingredients and small amounts of iron from chocolate-based ingredients. Nutrition values are estimates and may vary depending on brands, portions, and ingredient choices.
FAQs
Can I make this ahead of time?
Yes. It can be prepared up to two days before serving and stored in the freezer.
Why is my crust falling apart?
The cookie crumbs may not have been mixed thoroughly with the melted butter.
Can I use a different ice cream flavor?
Absolutely. Vanilla, peanut butter, or cookies-and-cream all work well.
What if the layers are too soft?
Freeze the cake longer before slicing and serving.
How long will leftovers stay fresh?
For the best quality, enjoy within 2 weeks when stored in the freezer.
How can I increase the peanut butter flavor?
Add an extra drizzle of peanut butter between the layers or on top before serving.
Conclusion
Looking for a dessert that feels special without requiring complicated steps? Nonnie’s 6 Ingredient Chocolate Peanut Butter Ice Cream Cake is the kind of recipe that fits easily into busy schedules while still bringing plenty of excitement to the table. The creamy layers, rich chocolate flavor, and smooth peanut butter make every slice enjoyable. You can customize the toppings, experiment with different ice cream flavors, and adjust the size for small family dinners or larger celebrations. Save this recipe for future gatherings and enjoy having a simple frozen dessert ready whenever the occasion calls for something sweet.
Nonnie’s 6 Ingredient Chocolate Peanut Butter Ice Cream Cake
Course: Dessert4
servings20
minutes550
kcalA simple frozen dessert made with chocolate ice cream, peanut butter, cookie crumbs, and whipped topping. Easy to prepare ahead and perfect for sharing with family and friends
Ingredients
1 quart chocolate ice cream, slightly softened
1 cup creamy peanut butter
12 chocolate sandwich cookies, crushed
4 tablespoons melted butter
1 cup whipped topping
¼ cup chocolate syrup
Directions
- Mix the crushed cookies and melted butter.
- Press the mixture into the bottom of an 8-inch freezer-safe dish.
- Freeze for 10 minutes.
- Spread half of the softened chocolate ice cream over the crust.
- Freeze for 15 minutes.
- Spread the peanut butter over the ice cream layer.
- Add the remaining chocolate ice cream and smooth the top.
- Spread whipped topping over the cake.
- Drizzle with chocolate syrup.
- Cover and freeze for at least 4 hours or overnight.
- Let sit for 5 minutes before slicing and serving.